

CentOS7 根目录扩容
系统环境:CentOS7
操作
[root@localsafe ~]# df -h
Filesystem               Size  Used Avail Use% Mounted on
devtmpfs                 3.9G     0  3.9G   0% /dev
tmpfs                    3.9G     0  3.9G   0% /dev/shm
tmpfs                    3.9G  8.6M  3.9G   1% /run
tmpfs                    3.9G     0  3.9G   0% /sys/fs/cgroup
/dev/mapper/centos-root   18G   14G  3.7G  80% /
/dev/sda1                497M  169M  328M  34% /boot
tmpfs                    797M     0  797M   0% /run/user/1003
tmpfs                    797M     0  797M   0% /run/user/0
[root@localsafe ~]# lsblk
NAME            MAJ:MIN RM  SIZE RO TYPE MOUNTPOINT
sda               8:0    0   80G  0 disk
├─sda2            8:2    0 19.5G  0 part
│ ├─centos-root 253:1    0 17.5G  0 lvm  /
│ └─centos-swap 253:0    0    2G  0 lvm  [SWAP]
└─sda1            8:1    0  500M  0 part /boot
[root@localsafe ~]#
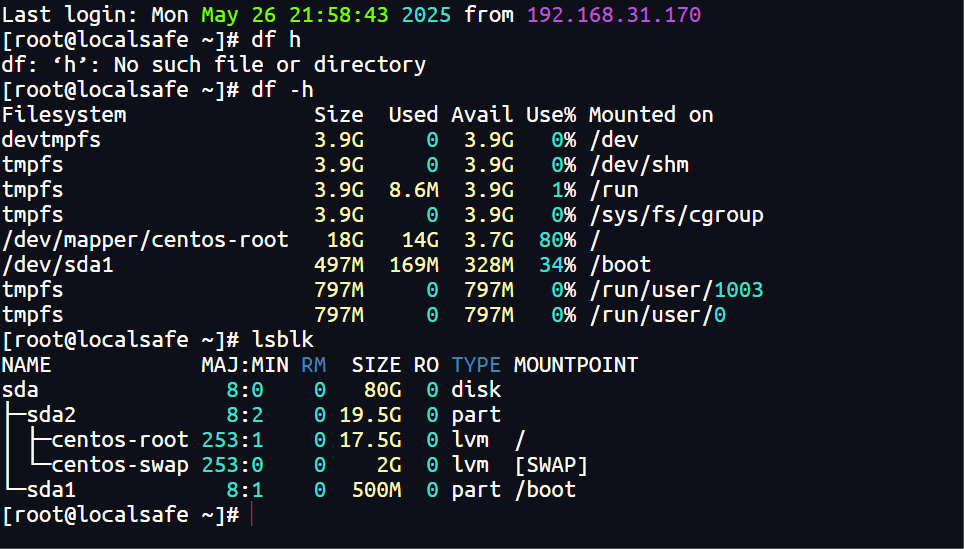
根据命令 df -h 和 lsblk 输出,了解系统是 CentOS(不是 Debian),并且使用了 LVM(Logical Volume Manager) 管理磁盘。根目录(/)位于 LVM 逻辑卷 /dev/mapper/centos-root,当前大小为 18G,已使用 82%(15G),剩余 3.4G。
你的磁盘 /dev/sda 总大小为 80G,但 LVM 卷组(VG)只使用了 sda2(19.5G),这意味着 还有约 60G 未分配空间(60G - 500M(/boot) - 19.5G = ~60G)
1、 检查当前 LVM 结构
sudo pvdisplay     # 查看物理卷(PV)
sudo vgdisplay     # 查看卷组(VG)
sudo lvdisplay     # 查看逻辑卷(LV)
[root@localsafe ~]# sudo pvdisplay
  --- Physical volume ---
  PV Name               /dev/sda2
  VG Name               centos
  PV Size               19.51 GiB / not usable 3.00 MiB
  Allocatable           yes
  PE Size               4.00 MiB
  Total PE              4994
  Free PE               10
  Allocated PE          4984
  PV UUID               tdv2xK-3ipL-3M3Y-dxMD-r71s-qcxC-D7uf5A

[root@localsafe ~]# sudo vgdisplay
  --- Volume group ---
  VG Name               centos
  System ID
  Format                lvm2
  Metadata Areas        1
  Metadata Sequence No  3
  VG Access             read/write
  VG Status             resizable
  MAX LV                0
  Cur LV                2
  Open LV               2
  Max PV                0
  Cur PV                1
  Act PV                1
  VG Size               19.51 GiB
  PE Size               4.00 MiB
  Total PE              4994
  Alloc PE / Size       4984 / 19.47 GiB
  Free  PE / Size       10 / 40.00 MiB
  VG UUID               8EV9oC-70jY-Jusz-a05V-1oH4-SDLU-sDQlUu

[root@localsafe ~]# sudo lvdisplay
  --- Logical volume ---
  LV Path                /dev/centos/swap
  LV Name                swap
  VG Name                centos
  LV UUID                TjhIhh-hqLc-tzSy-gpiU-lFDN-MtZK-Zp9CTv
  LV Write Access        read/write
  LV Creation host, time localhost, 2023-07-26 08:34:24 +0800
  LV Status              available
  # open                 2
  LV Size                2.00 GiB
  Current LE             512
  Segments               1
  Allocation             inherit
  Read ahead sectors     auto
  - currently set to     8192
  Block device           253:0

  --- Logical volume ---
  LV Path                /dev/centos/root
  LV Name                root
  VG Name                centos
  LV UUID                FnC7SM-D61W-hHl3-T2Vu-YHJv-A5L8-kViowK
  LV Write Access        read/write
  LV Creation host, time localhost, 2023-07-26 08:34:24 +0800
  LV Status              available
  # open                 1
  LV Size                17.47 GiB
  Current LE             4472
  Segments               1
  Allocation             inherit
  Read ahead sectors     auto
  - currently set to     8192
  Block device           253:1

[root@localsafe ~]#
预期输出:
-
PV(物理卷):
/dev/sda2 -
VG(卷组):
centos -
LV(逻辑卷):
/dev/centos/root(根目录)
2、扩展 /dev/sda2 分区(使用 fdisk)
你的 sda2 当前只占用 19.5GB,而 /dev/sda 有 60GB,可以扩展 sda2 到更大空间。
(1)进入 fdisk
sudo fdisk /dev/sda
(2)操作步骤
-
输入
d→ 选择2(删除sda2分区)。 -
输入
n→ 新建sda2:-
起始扇区:必须和原来一致(
1026048,见fdisk -l输出)。 -
结束扇区:直接回车(使用默认最大值,占满剩余空间)。
-
-
输入
t→ 选择2→ 输入8e(设置为 LVM 类型)。 -
输入
w保存并退出。
[root@localsafe ~]# sudo fdisk /dev/sda
Welcome to fdisk (util-linux 2.23.2).

Changes will remain in memory only, until you decide to write them.
Be careful before using the write command.


Command (m for help): d
Partition number (1,2, default 2): 2
Partition 2 is deleted

Command (m for help): n
Partition type:
   p   primary (1 primary, 0 extended, 3 free)
   e   extended
Select (default p):
Using default response p
Partition number (2-4, default 2):
First sector (1026048-167772159, default 1026048):
Using default value 1026048
Last sector, +sectors or +size{K,M,G} (1026048-167772159, default 167772159):
Using default value 167772159
Partition 2 of type Linux and of size 79.5 GiB is set

Command (m for help): t
Partition number (1,2, default 2): 2
Hex code (type L to list all codes): 8e
Changed type of partition 'Linux' to 'Linux LVM'

Command (m for help): w
The partition table has been altered!

Calling ioctl() to re-read partition table.

WARNING: Re-reading the partition table failed with error 16: Device or resource busy.
The kernel still uses the old table. The new table will be used at
the next reboot or after you run partprobe(8) or kpartx(8)
Syncing disks.
[root@localsafe ~]#

(3)刷新分区表
sudo partprobe /dev/sda
反馈报错
[root@localsafe ~]# sudo partprobe /dev/sda
Error: Partition(s) 2 on /dev/sda have been written, but we have been unable to inform the kernel of the change, probably because it/they are in use.  As a result, the old partition(s) will remain in use.  You should reboot now before making further changes.
[root@localsafe ~]#
这是已成功调整了 /dev/sda2 分区的大小,但遇到 内核未重新加载分区表 的警告(Device or resource busy)。这是因为 LVM 正在使用该分区,需要 重启系统 或 强制刷新 才能继续后续操作。
解决方案
sudo partx -u /dev/sda  # 强制更新内核分区表
sudo pvresize /dev/sda2  # 重新检测物理卷大小

检查物理卷(PV)是否扩容
sudo pvdisplay
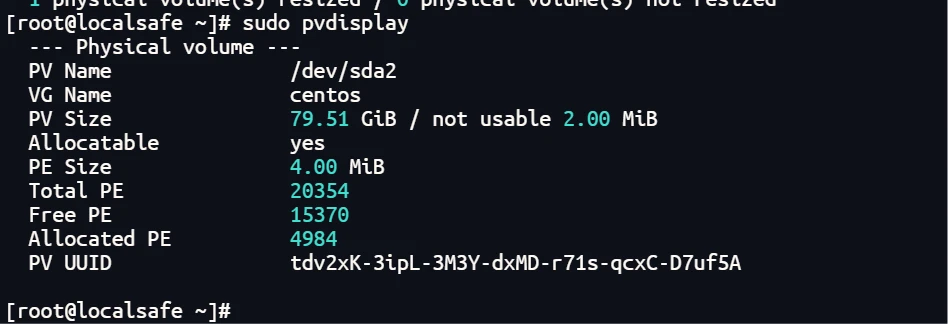
正常应该显示 /dev/sda2 的 Size 变为 79.51 GiB(或接近磁盘最大值)。
扩展逻辑卷(LV)
sudo lvextend -l +100%FREE /dev/centos/root  # 使用全部剩余空间
# 或指定大小(例如增加 40G)
sudo lvextend -L +40G /dev/centos/root
4. 调整文件系统
(1)ext4 文件系统
sudo resize2fs /dev/centos/root
(2)xfs 文件系统
sudo xfs_growfs /
5. 验证
df -h /

总结
| 步骤 | 命令 | 作用 |
|---|---|---|
| 刷新分区表 | sudo partx -u /dev/sda |
解决 Device or resource busy 错误 |
| 扩展 PV | sudo pvresize /dev/sda2 |
让 LVM 识别新增空间 |
| 扩展 LV | sudo lvextend -l +100%FREE /dev/centos/root |
扩容逻辑卷 |
| 调整文件系统 | sudo resize2fs /dev/centos/root 或 xfs_growfs / |
生效扩容 |
© 版权声明
文章版权归作者所有,未经允许请勿转载。
相关文章


暂无评论...